GeoCities.us GeoCities.us » MotorCity » Garage Get your FREE home page!

BRETT'S GO-KART
PROJECT

scrap steel + a dead lawn mower + one summer = 28 MPH

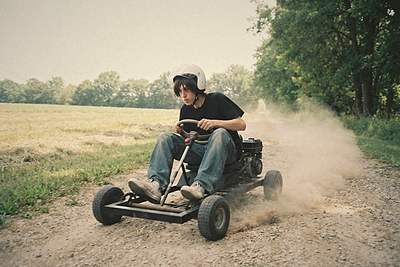
Brett driving the go-kart down a dirt lane, dust flying behind him
THE FINISHED PRODUCT IN ACTION!!! Aug. 7

Hey. I'm Brett, I'm 15, and this summer I built a go-kart in our garage. It's not a kit. Everything on it came from the scrap yard, a swap meet, a parts catalog, or somebody's junk pile, and the whole thing cost $143.27. My grandpa is a retired welder (41 years, mostly in a boiler shop) and he did all the welding. I did everything else: the design, the measuring, the cutting, the drilling, the bolting, the painting, and the crashing. More about that below.

Top speed is 28 mph. My dad drove the truck next to me on the lane and read the speedometer. He says that number is "plenty."

BUILD LOG

Saturday, April 17, 1999 - CUTTING
Got 46 pounds of square steel tubing from the scrap yard for $9.20. Cut it to length with Grandpa's chop saw from my drawing on graph paper. Grandpa welded the first corners while I held them square. Rule number one: never look at the arc. Grandpa says that about twelve times a day.

Saturday, April 24 - THE FRAME
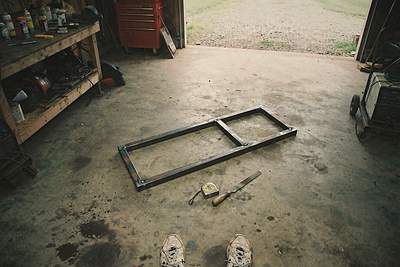
All welded and squared up. It's basically a big rectangle with a crosspiece. Measured corner to corner both ways to make sure it's square. It was off 1/8 inch and Grandpa said that was good enough for a go-kart and better than most houses.

The bare welded steel frame of the go-kart lying on the garage floor
The bare frame. Those are my shoes.

May - AXLE AND STEERING
The rear axle runs through two pillow block bearings bolted under the back of the frame. The steering took three tries. The first time the front wheels pointed different directions. The second time it wobbled so bad at walking speed the whole kart shook. The third time I got the tie rods the same length and it tracks straight. Lesson learned: measure twice, then measure again.

June - BRAKES, PAINT AND ENGINE
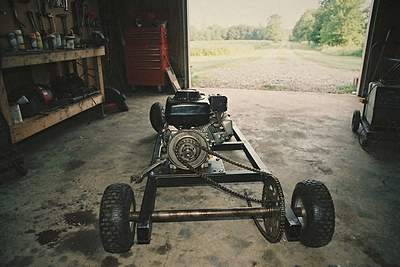
Brakes are a band brake off a junked minibike, on a drum on the rear axle, worked by a pedal. Painted the frame flat black. Then the engine. It's a 5 horsepower Briggs & Stratton off Mr. Raby's lawn mower down the road. The mower died, the engine didn't, and he said "get it out of my shed." It sits on a steel plate behind the seat with a centrifugal clutch on the shaft. A chain runs from the clutch to a 60-tooth sprocket on the axle. Centrifugal clutch means when the engine idles the kart sits still, and when you give it gas the clutch grabs and you GO.

The back of the go-kart with the engine mounted and the chain running to the axle sprocket
June 26. Engine mounted, chain on. Getting real now.

Saturday, July 17 - FIRST RUN!!!
Pulled the cord, it started, I gave it gas and it went. All the way down the lane and back. My mom says I yelled the whole way. I don't remember that but I believe her.

Saturday, July 24 - THE WOODPILE
The throttle stuck wide open at the end of the lane. I tried to turn, did not turn enough, and went into the woodpile. I'm fine (scraped elbow). The kart had a bent tie rod and a cracked front crossmember. The woodpile is fine too. This is why there is now a kill switch on the steering column, which Grandpa insisted on, and he was right.

Saturday, July 31 - REPAIRS
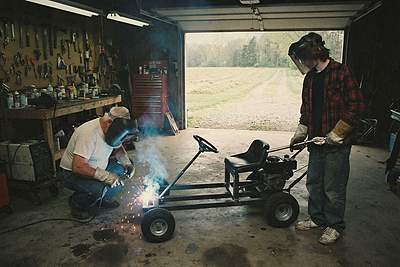
New tie rod, and Grandpa welded a brace across the front so it's stronger than before. I held it with locking pliers. Face shield and gloves, every time.

Grandpa in a welding helmet welding the front of the go-kart while Brett, in a face shield and gloves, holds a piece with locking pliers
Grandpa welding the new brace. That's me in the face shield.

Saturday, August 7 - DONE
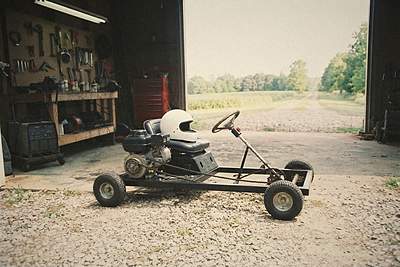
Fixed the throttle cable so it can't stick, adjusted the brake, tightened every bolt, and it's finished.

The finished black go-kart on the gravel driveway with a white helmet on the seat
Finished. The red button on the steering column is the kill switch.
PARTS LIST
Square steel tubing, scrap yard (46 lb.)$9.20
Steel rod for the rear axle, scrap yard$2.50
5 hp engine (Mr. Raby's dead mower)FREE
Centrifugal clutch$29.95
#35 chain, 5 feet$8.50
60-tooth axle sprocket$12.95
2 pillow block bearings$13.90
4 wheels and tires (swap meet)$20.00
Steering spindles, pair (catalog)$16.95
Steering wheel (swap meet)$3.00
Seat off a junked riding mowerFREE
Brake band and drum (junked minibike)$4.00
Throttle cable$4.49
Kill switch$3.99
Bolts, nuts, washers, cotter pins$7.87
Flat black spray paint, 3 cans$5.97
TOTAL$143.27
Not counting welding rod and Grandpa's time, which he says I can pay back by mowing his yard until I'm 30.

SAFETY RULES (NO EXCEPTIONS)
  1. Helmet. Always. Even just down the lane and back.
  2. Kill switch works before every ride. Test it.
  3. Shoes, not sandals.
  4. Nobody rides with you. It's a one-seater.
  5. NEVER on the road. Not even once. It's not street legal and cars can't see you.
  6. If you build one: don't look at the welding arc, wear gloves, and have someone who knows what they're doing do the welding.
WHAT I'D CHANGE NEXT TIME
  • A bigger rear sprocket. It'd have less top speed but way more pickup coming off a stop, and my dad would like the lower top speed too.
  • A seat that isn't so hard. After ten runs down the lane you know what I mean.
  • A real disc brake instead of the band brake. The band brake works but it squeals like a pig.
  • A wider front end so it doesn't feel tippy in the turns.
THANKS, GRANDPA
I couldn't have built this without my grandpa. He drove over every Saturday all summer, he did every weld, and he never once took a tool out of my hands to do it himself, even when I was doing it wrong, which was a lot. He just waited until I figured it out. He taught me how to measure, how to square a frame, why you never look at the arc, and that when something doesn't work you fix it instead of quitting. He also says the woodpile was "a learning experience." Grandpa, if you're reading this (my mom showed you how): thank you. Next summer, a minibike?

Questions? Building your own? E-mail me: [email protected]


YOU ARE VISITOR #
000689
Last updated 9/6/99