GeoCities.us GeoCities.us » NapaValley » Bakery Get your FREE home page!
●●●●●●●●●●●●●●●●●●●●●●
Buttercream, Roses & Stacking
<< back to Dixie's Cake Book
●●●●●●●●●●●●●●●●●●●●●●

People ask me for these more than anything, so here they are, the way I do them. I'm not saying it's the only way. I'm saying it's my way and it hasn't failed me yet, except for that once in July.

My Decorator's Buttercream

● 1/2 cup solid white vegetable shortening
● 1/2 cup butter, softened
● 1 teaspoon clear vanilla
● 4 cups powdered sugar, sifted (about one pound)
● 2 tablespoons milk

Cream the shortening and butter together with the mixer until they're light. Beat in the vanilla. Add the powdered sugar a cup at a time on low speed, scraping the bowl, so you don't end up wearing it. It'll get very stiff. Add the milk and beat on medium until it's fluffy. Keep the bowl covered with a damp towel while you work, because it crusts.

That's a stiff icing, good for roses and borders. For icing the cake itself, beat in another tablespoon or two of milk so it spreads.

Why shortening? It holds its shape and stands up to the heat better than all butter. In July and August I use all shortening and no butter at all.

Why clear vanilla? Regular vanilla is brown, and it turns your white icing the color of a manila folder. A bride wants white. Clear vanilla keeps it white.

Coloring: use paste colors, not the little liquid bottles from the grocery store, which make the icing runny. Add it with a toothpick, a little at a time. Colors get darker as they sit, so mix it a shade lighter than you want and wait an hour.

How I Pipe a Rose
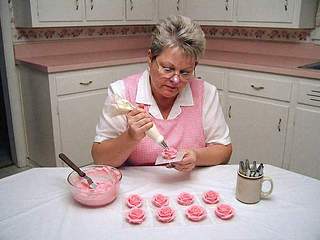
Dixie at her kitchen table piping a pink buttercream rose on a flower nail, with finished roses on squares of waxed paper in front of her
Paul took this. Pink roses for a baby shower on Saturday.

You need a flower nail, which looks like a big thumbtack, a little round metal flat top on a spike. You hold the spike in your left hand and turn it with your fingers while you pipe with your right. (Lefties, do it backwards.) Cut little squares of waxed paper about two inches across and stick one to the nail with a dab of icing. Use the stiff icing.

  1. The base. With a big round tip (I use a number 12), hold the bag straight up and squeeze out a cone of icing in the middle of the nail, like a little Hershey's Kiss, about an inch tall. Everything gets built around this.
  2. The bud. Change to a petal tip. That's the one shaped like a teardrop, wide at one end and narrow at the other (I use a number 104). Hold it with the wide end down and the narrow end pointing up and a little in. Squeeze and turn the nail all the way around while you wrap a ribbon of icing around the top of the cone, so it looks like a tight little bud.
  3. Row of three. Make three petals around the bud. For each one, start at the base, go up in an arch and come back down, turning the nail as you go. Each petal overlaps the one before it a little.
  4. Row of five. Same thing, a little lower and a little more open, five petals.
  5. Row of seven. The outside row, lower still and tipped out, seven petals.
  6. Slide the waxed paper off the nail onto a cookie sheet and start the next one. Let them set up in the refrigerator, or overnight on the counter so they crust, and then you can pick them up with a spatula and put them right on the cake.

Your first twenty roses will look like cabbages. Mine did. Scrape them back in the bowl and go again. That's the nice thing about buttercream. It doesn't hold a grudge.

Stacking a Tiered Cake So It Doesn't Sink

Cake is soft. If you just set one tier on another, the top one sinks right down into the bottom one like a foot in mud. Here's what holds it up:

  1. Every tier sits on its own cardboard circle, cut the same size as the tier. The cardboard is what the next tier rests on.
  2. Dowels. Ice the bottom tier. Then take the cardboard circle for the next tier, center it lightly on top and press just enough to leave an outline. Push a wooden dowel straight down into the bottom tier inside that outline, all the way to the board, mark it right at the top of the icing, pull it out, and cut all your dowels to that length. For a 10-inch tier on top I use seven dowels, one in the middle and six in a circle about an inch in from the outline. They take the weight, not the cake.
  3. Set the next tier, on its cardboard, down on top. Do the same thing in that tier for the one above it.
  4. One long dowel through the middle. Once it's all stacked, sharpen one end of a long dowel in a pencil sharpener and tap it straight down through all the tiers and all the cardboards from the very top, all the way to the bottom board. That keeps it from sliding when Paul hits a pothole.
  5. Stack it where it's going. For a big wedding cake, I carry the tiers separately and put them together at the reception.
  6. Pipe the borders around the bottom of each tier last. They hide the cardboard.

And if it's July and outdoors, God help you. See the Leaning Cake.

<< back to Dixie's Cake Book

●●●●●●●●●●●●●●●●●●●●●●
Questions? [email protected]
Last updated Friday, September 24, 1999
